State of the Brewnion

During this last week I’ve tapped a pumpkin beer and opened the last of the IPAs Joe and I brewed back in April. The quality of the last 4 beers I’ve brewed is consistently better than my previous beers, and I’m very satisfied with the prospects. The pumpkin ale is a little spicier than I prefer, and the color is almost a sickly green, but it’s quite good. Michelle, who I typically make the beer for, seems content with it.

I expected that the IPA would be a throw-away simply because of it’s age. To my surprise, it was excellent. The aroma was still fresh and citrusy, and the flavor had not dulled any over time. I think it was probably the best carbonated of the bunch, and really made quite a nice finish for the day. I’ll have to go back to the recipe again.

I still have to keg the Imperial IPA, but I don’t have a spare at the moment. Probably time to pick another corny up.

Crank and Shake: Force Carbonation revisited

Scott and I were discussing how we force carbonate our beers recently and I had trouble remembering why I did mine the way I had. Scott said he was still using the old “crank & shake” method, which while fun, is really potentially dangerous for your back and not all that great for the beer. Where better to turn for the answer than BYO’s Mr. Wizard?

Under-carbonated beer is of course what you had before applying the crank-n-shake method. I use the term “crank” to describe the random application of gas pressure resulting from cranking the gas regulator to its maximum setting of 30 psi and unleashing this pressure on the poor keg of beer. If beer could become ill from too much dissolved gas like scuba divers do when staying down too deep for too long, these beers would certainly suffer from a high rate of the bends.

…Once you have your gas plan, attach your keg to the carbon dioxide tank adjusted to the pressure dictated by your gas table and wait. A batch of homebrew is small and the headspace pressure will equilibrate with the beer in about 3 days. The only thing you can do to speed this method up is to periodically shake the keg. Some people want to bubble the gas through the dip tube in the keg, but this really does not speed things up much because the gas bubbles are too large and zip through the beer before much gas diffuses into solution. It also causes foaming. Take my advice and just hang tight!

Here’s the rest of the article. In summary:

  • Find the correct volume of gas for your beer
  • Push that pressure into your keg
  • Wait

Edit: Rob over at tastybrew.com has a keg pressure calculator.

Moving beers

I kegged the porter yesterday and there was enough left over for half a pint to enjoy. Even uncarbonated it was delicious. I also moved the pumpkin ale and IPA into secondary, and while they both seem to be at their target gravity, I had to move the pumpkin to add spices, and the IPA so it could be dry hopped. The pumpkin ale had a mellow, clean body that will hopefully be improved with spices, and like Scott mentioned, the pumpkin flavor is rather minor. We’ll see what happens in the keg. There are about 3 gallons of it and lots of trub/scum in the carboy.

The Imperial IPA had a lovely aroma and huge hop flavor, just like I wanted. Somehow it’s down just just over 5 gallons of beer, which is rather sad. Live and learn.

Long brew day

Mashing the pumpkin

I headed up to Snohomish this weekend to visit one of my brew buddies Scott. We were going to attempt a 10 gallon batch of pumpkin ale together first, then we’d each brew our own beers: He a Belgian-style brown, and I went for a big IPA. We started at noon – much later than we ought to have, and brewed straight to 10:30pm. Friends from Bellingham came down to hang out, assuming like we did, that we’d be done by 6pm. However, our timing was a little off.

The pumpkin ale (recipe forthcoming) took much longer to mash & lauter than we expected, and we didn’t finish the boil until after 6 p.m. I suppose this is ok since it was a double batch, though we only pulled off like 8 gallons instead of the expected 10. Both the hot break and the krausen have a sickly lovely orange cruft on top showing that it was indeed a pumpkin ale. I baked the pumpkin down here in Portland and froze it in bricks, so they looked somewhat like illicit materials, along with the hops. We couldn’t resist doing a “drug bust” picture, but without guns, the only thing we could find was an axe. Not quite the effect we were going for, but funny in its own right.

Pumpkin Bust

Scott’s bruin went well and finished a while before mine and looks and smells exactly like you’d hope. The Imperial had some issues because the grain was so plentiful, and I formulated the recipe for 8 gallons, forgetting that I only had a 7 gallon carboy. “Idiot” I was, and though the car had been full of brewing gear, I had not brought a third carboy. Needless to say, the mash wasn’t that efficient since I cut it short, and the gravity was a little lower than expected, finishing at 1.074. Still, it smells delightful, and the car ride home was hoppy.

I had to roll down the windows several times on the drive home for fear that I would put myself to sleep with all the carbon dioxide that the two fermenting beers were exhaling. I did make it, and every time I pass the IPA, I catch a ripe, grassy smell.

Max C Imperial IPA

Here’s a recipe for the Imperial IPA I’m brewing this weekend. It’ll be an 8 gallon batch (5 keg, 3 bottled) and the hop bill is still under scrutiny.

Malt bill

  • 16 lbs Domestic 2-row malt
  • 1 lbs Domestic Munich
  • 1.5 lbs CaraPils
  • 0.5 lbs Crystal 40L

Hops

  • 2 oz Chinook (12.5% alpha) @ 60 minutes
  • 1 oz Centennial (10% alpha) @ 30 minutes
  • 1 oz Centennial (10% alpha) @ 20 minutes
  • 1 oz Chinook (12.5% alpha) @ 15 minutes
  • 1 oz Centennial (10% alpha) @ 10 minutes
  • 1.5 oz Centennial (10% alpha) @ 5 minutes
  • 1.5 oz Centennial (10% alpha) @ 2 minutes
  • 1.5 oz Centennial (10% alpha) @ Dry Hopped

Misc. Ingredients

  • Fermentis Safale S-05 dry yeast
  • Irish Moss @ 15 minutes

Seems like I should be able to fit some more more hops in there. I can’t find any information on whether S-05 will ferment enough to hit my target gravity.

Edit: I changed the name of the beer at the last minute celebration of our friend’s newest, Maximus Charles Walz, born on Friday, October 5th. Nate’ll have get a batch as well, but a Scottish seems more appropriate.

Porter status

Just a note, the porter tastes awesome. It’s already at target gravity, but I moved it to secondary anyway to give it one more chance to get infected. I don’t really want to bottle, so I may move it to keg even though I don’t have a fridge yet.

Moment of Truth, part 2

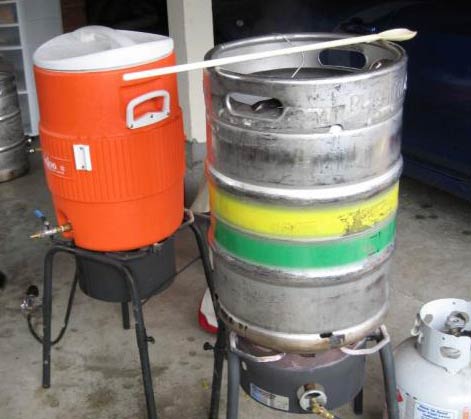
I successfully brewed a robust porter on Sunday. The entire process lasted about 5 hours from setup, to tear down and cleaning. The mash tun worked very well, and only leaked a couple drops when I wrenched on the faucet the first time. It held temperature like a champ, though my strike temp was a little low, so I was mashing at 151F for the first 20 minutes. I got it up to 153, but it was a pain with the small 1 gallon kettle. Note to self, get 5 gallon back from Alan.

I didn’t take any pictures, mostly because I was so focused this first time, and because I was trying to fit some other chores in as well, like playing air guitar to a few Primus albums. Pictures will be taken, however, during the next batch for photo proof of the success of the mash tun.

Measuring temperature was a challenge at first. I bought a small thermometer that can be twisted to adjust the sensitivity. The problem was that the sensitivity is in the 10 degree Fahrenheit range, and each twist is in the 10 degree range as well. So,I was on my mashing temp + or – 10 degrees. I quickly realized this wouldn’t work, so I snagged my wife’s electric meat thermometer and set it on Pork, partly as a nod to B.S. Brewing, and partly because 170 (Pork), is the mash out temperature.

This thermometer worked much better and I could see it from the doorway, so I asked Michelle, who was out running errands, to pick me up my own. I don’t want to end up with another Salted Ham IPA. She also picked up a new timer, a kitchen gadget we both use, but the steam from my brewing is probably what made the battery corrode and the LCD go bad.

Anyway, so the mash went really well, though I ended up stopping the lauter process a few times to heat more water. This probably inadvertently mashed it a little more, but the mash looked good and I got 7 gallons that I boiled down to around 6 gallons at an O.G. of 1.060. The tun worked well, and I only had one “oh shit” moment when I realized I forgot to pick up some iodine to check for starch conversion. I remembered what Palmer said though and tried a little iodophor, which did not turn black. Now the beer is happily fermenting away and should be racked to secondary on Friday or Saturday.

Mash Tun shopping list

A trip to the store.

  • Stainless Steel braided line: $9.49
  • 1/2″ brass close nipple: $2.58
  • 2 – 1/2″ washers: $0.74
  • 1/2″ to 3/8″ compression fitting: $2.39
  • 10 gallon HDPE drinking cooler: $39.97
  • 1/2″ brass valve: $5.77

So, for $60, I have an assembled 10 gallon insulated mash tun. I’m still uncertain if the braided stainless steel is the way to go, but I’m thinking it’ll work well enough compared to a false bottom or scored manifold.

I ended up using a compression fitting to connect to one end of the braided line, which meant I didn’t have to sweat any copper joints. Plus, copper is so expensive right now that even small sections of coiled copper have security tags attached.

Next: assembly….